Mallika means Jasmine flower in Indian languages. It also has different meanings in other languages. Ideally it is a pineapple doily but since I love to give names to my patterns I chose the name Mallika because the cluster stitches worked in the pineapples reminded me of jasmine buds. Of all the doilies or mandalas I have designed so far I consider this as my best. I had just one ball of this Anchor knitting cotton with me, so I wanted to make something small enough that wouldn't require me to buy anymore balls of thread. I designed the final few rounds keeping that in mind, otherwise I would have gone for a bigger doily. Anyway I feel this is perfect. It looks so elegant and I just can't stop admiring it.

Materials
For making this doily I used:Anchor mercerized knitting cotton 50 gm
Crochet hook size B/2 mm
Yarn needle
Size
The doily has a diameter of approximately 15.5 inchesCrochet Terms/Stitches Used
The pattern is written in standard American terminology
** - Repeat instructions between asterisks as many times as directed
[ ]/{} - Work instructions within parenthesis as a set as many times as directed
ch - chain
st/sts - stitch/stitches
sl st - slip stitch
sc - single crochet (UK - double crochet)
dc - double crochet (UK - treble)
dc2tog/dc3tog - double crochet worked together in 2/3 consecutive stitches (dc decrease)
cluster - double crochet 3 stitches worked together in the same stitch/space
picot - ch 3, sl st in the previous dc
** - Repeat instructions between asterisks as many times as directed
[ ]/{} - Work instructions within parenthesis as a set as many times as directed
ch - chain
st/sts - stitch/stitches
sl st - slip stitch
sc - single crochet (UK - double crochet)
dc - double crochet (UK - treble)
dc2tog/dc3tog - double crochet worked together in 2/3 consecutive stitches (dc decrease)
cluster - double crochet 3 stitches worked together in the same stitch/space
picot - ch 3, sl st in the previous dc
Instruction
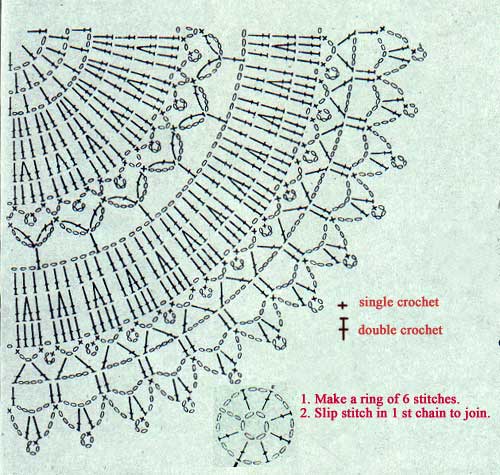
Round 1: Make a magic
ring. Ch 4, dc into ring, ch 1, repeat [dc into ring, ch 1] 14 more times. Join
with a sl st to the 3rd ch at the beginning of round. (You will have
16 ch-1 spaces.
Round 2: Sl st in next
ch-1 space, repeat [ch 3, sc in next ch-1 space] around.
Round 3: Sl st in ch-3
space, ch 6, sl st in the 4th ch (forms a picot), dc in same space, **ch
3, [dc, picot, dc] in next ch-3 space, ** Repeat from ** to ** around. Instead
of the last ch 3, work a dc into the 3rd ch at the beginning of
round to join.
Round 4:
Round 5: **Ch 7, [sc,
ch 3, sc] in next ch-5 space** Repeat from ** to ** around.
Round 6: Sl st in next
3 ch, ch 1, [sc, ch 3, sc] in same space, ch 7, **[sc, ch 3, sc] in next ch-7
space, ch 7** Repeat from ** to ** around. Join with a sl st to the 1st
sc.
Round 7: Sl st in ch-3
space, ch 1, sc in same space, ch 2, 7 dc in next ch-7 space, ch 2, **sc in
ch-3 space, ch 2, 7 dc in next ch-7 space, ch 2** Repeat from ** to ** around. Join
with a sl st to 1st sc.
Round 8: Sl st in 2
ch, sl st in 1st dc, ch 2, dc in next st (counts as dc2tog), dc in next 3 dc, dc2tog, ch 3, sc in ch-2 space,
ch 1, sc in next ch-2 space, ch 3, **dc2tog, dc in next 3 sts, dc2tog, ch 3, sc
in ch-2 space, ch 1, sc in next ch-2 space, ch 3** Repeat from ** to ** around.
Join with a sl st to dc2tog at the beginning of round.
Round 9: Ch 2, dc in
next st (counts as dc2tog), dc in
next dc, dc2tog, ch 3, [dc, ch 2, dc] in ch-1 space, ch 3, **dc2tog, dc in next
dc, dc2tog, ch 3, [dc, ch 2, dc] in next ch-1 space, ch 3** Repeat from ** to
** around. Join with a sl st to dc2tog at the beginning of round.
Round 10: Ch 2, dc2tog
(counts as dc3tog), ch 3, 6 dc in
ch-2 space, ch 3, **dc3tog, ch 3, 6 dc in ch-2 space, ch 3** Repeat from ** to
** around. Join with a sl st to dc3tog.
Round 11: Ch 1, **[sc,
ch 3, sc] in dc3tog, ch 3, [dc in next dc, ch 1] 5 times, dc in next dc, ch 3**
Repeat from ** to ** around. Join with a sl st to sc at the beginning of round.
Round 12: Sl st in ch-3 space, ch 5 (counts as dc + ch 2), dc in same space, ch 1, skip next ch-3 space, cluster in ch-1 space, [ch 3, cluster in next ch-1 space] 4 times, ch 1, skip next ch-3 space, **[dc, ch 2, dc] in ch-3 space at the top of dc3tog, ch 1, skip next ch-3 space, cluster in next ch-1 space, [ch 3, cluster in ch-1 space,] 4 times, ch 1** Repeat from ** to ** around. Join with a sl st to the 3rd st.
 Round 13: Sl st in ch-2
space, ch 6 (counts as dc + ch 3), dc in same space, ch 2, cluster in next ch-3
space, [ch 3, cluster in ch-3 space] 3 times, ch 2 **[dc, ch 3, dc] in ch-2
space, ch 2, cluster in next ch-3 space, [ch 3, cluster in ch-3 space] 3 times,
ch 2** Repeat from ** to ** around. Join with a sl st to the 3rd st.
Round 13: Sl st in ch-2
space, ch 6 (counts as dc + ch 3), dc in same space, ch 2, cluster in next ch-3
space, [ch 3, cluster in ch-3 space] 3 times, ch 2 **[dc, ch 3, dc] in ch-2
space, ch 2, cluster in next ch-3 space, [ch 3, cluster in ch-3 space] 3 times,
ch 2** Repeat from ** to ** around. Join with a sl st to the 3rd st.
Round 12: Sl st in ch-3 space, ch 5 (counts as dc + ch 2), dc in same space, ch 1, skip next ch-3 space, cluster in ch-1 space, [ch 3, cluster in next ch-1 space] 4 times, ch 1, skip next ch-3 space, **[dc, ch 2, dc] in ch-3 space at the top of dc3tog, ch 1, skip next ch-3 space, cluster in next ch-1 space, [ch 3, cluster in ch-1 space,] 4 times, ch 1** Repeat from ** to ** around. Join with a sl st to the 3rd st.

Round 14: Sl st in ch-3
space, ch 3 (counts as dc), 4 dc in ch-3 space, ch 3, cluster in next ch-3
space, [ch 3, cluster in ch-3 space] 2 times, ch 3, **5 dc in next ch-3 space, ch
3, cluster in next ch-3 space, [ch 3, cluster in ch-3 space] 2 times, ch 3**
Repeat from ** to ** around. Join with a sl st to the 3rd st.
Round 15: Ch 4 (counts
as dc + ch 1), [dc in next dc, ch 1] 3 times, dc in next dc, ch 3, [cluster in
ch-3 space after cluster, ch 3] 2 times, **[dc in next dc, ch 1] 4 times, dc in
next dc, ch 3, [cluster in ch-3 space after cluster, ch 3] 2 times** Repeat
from ** to ** around. Join with a sl st to the 3rd st.
Round 16: Ch 6 (counts
as dc + ch 3), [dc in next dc, ch 3] 3 times, dc in next dc, ch 3, cluster in
ch-3 space after cluster, ch 3, **[dc in next dc, ch 3] 4 times, dc in next dc,
ch 3, cluster in ch-3 space after cluster, ch 3** Repeat from ** to ** around.
Join with a sl st to the 3rd st.
Round 17: Sl st in ch-3 space, ch 1, [sc, picot,sc] in same space, {ch 3, [sc, picot, sc] in next ch-3 space} 3 times, ch 5, [sc, ch 3, sc] in cluster, ch 5, **[sc, picot, sc] in ch-3 space after dc, {ch 3, [sc, picot, sc] in next ch-3 space} 3 times, ch 5, [sc, picot, sc] in cluster, ch 5** Repeat from ** to ** around. Fasten off and weave in the ends.
The doily needs blocking.
I hope you enjoyed this pattern.

Round 17: Sl st in ch-3 space, ch 1, [sc, picot,sc] in same space, {ch 3, [sc, picot, sc] in next ch-3 space} 3 times, ch 5, [sc, ch 3, sc] in cluster, ch 5, **[sc, picot, sc] in ch-3 space after dc, {ch 3, [sc, picot, sc] in next ch-3 space} 3 times, ch 5, [sc, picot, sc] in cluster, ch 5** Repeat from ** to ** around. Fasten off and weave in the ends.
The doily needs blocking.
I hope you enjoyed this pattern.