

Hi everyone, looking ahead to a wonderful weekend? My weekends are not so very interesting. It is just like any other day except that I have more work on weekends :-)
This is the stool cover that I showed you earlier. It is done and I am very pleased.

This stitch was a little confusing at the start and I even considered making a simple and easy granny instead, but I didn't want to give up so easily. So I tried and tried (oh... not so many times, it is not that difficult) and after the first couple of rows the hook started to glide along smoothly.

I felt like sharing what I learnt with you all and so made this tutorial. I would like to warn though that this MAY NOT BE suitable for a beginner. It may appear a little confusing initially, but, of course, anything can be mastered with a little practice.
I have tried to explain as best as possible through these photos, so please pay attention to the details in the photos.
Shall we start?
1. Make 6 chains.

2. Double crochet (dc) into the 4th, 5th and 6th chains from the hook.

Your first row is done. If you wish to change colours you can do so at the beginning of a new row.
3. Chain 6.

4. Make double crochet (dc) into the 4th, 5th and 6th chains from the hook.

5. Look at the set of photos below. As shown in the first photo take the hook to the place where I have marked the arrow head (that would be your first 3 chains from the hook of the basic chains that you made) and make a slip stitch.

6. Make 3 ch.

7. Make 3 dc in the same space. Your 2nd row is finished.

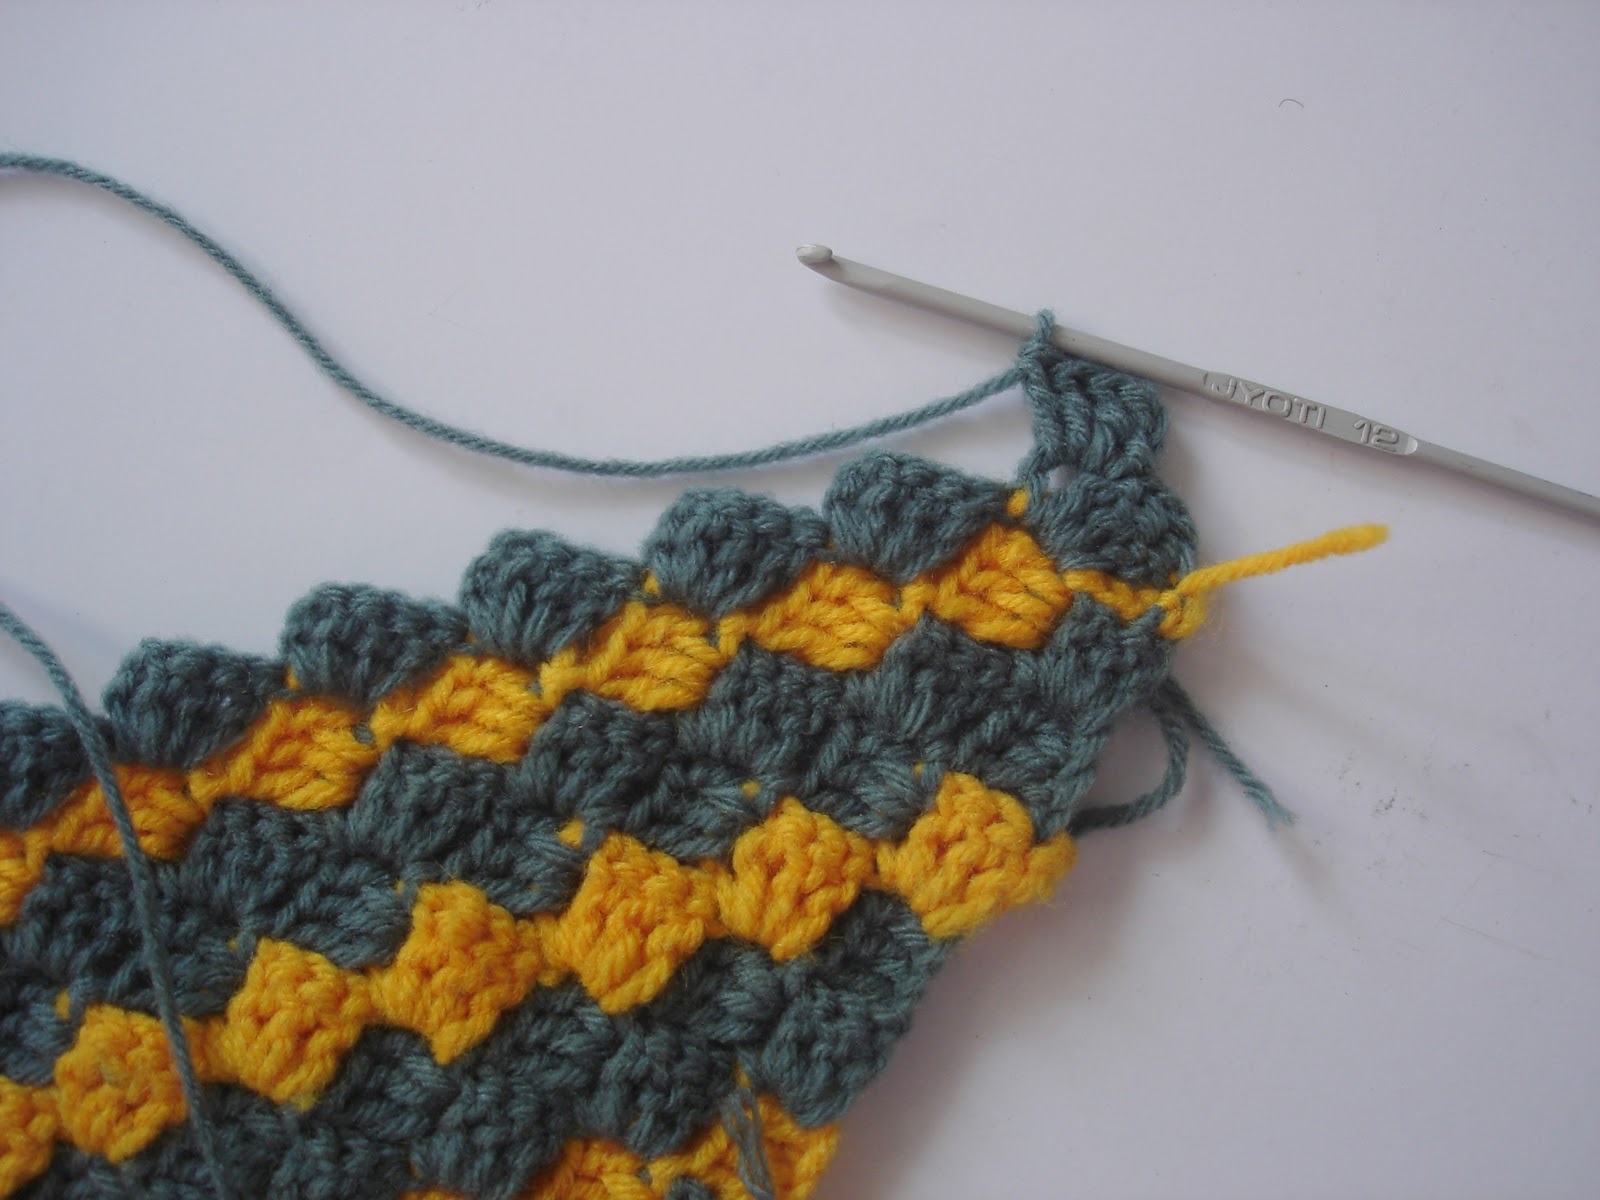
8. If you are joining a new colour do it and make 6 ch.

9. Make dc into 4th, 5th and 6th ch from hook as in step 2 and slip stitch as shown.

10. Make 3 ch.

11. Make 3 dc into the 3 ch space as you did in step 7.

12. Join with slip stitch to the 3-ch space in the next box as shown below.

13. Make 3 chains and 3 dc into the same space.

This is how you will be progressing and increasing the size of the pattern. Continue until you have reached the desired length.

In the above photo you can see that I have reached the desired length at the top left corner but have to increase more in the bottom right corner. So I have to stop increasing on one side and continue to increase on the other side. If you are working a square, then you can start decreasing both the sides simultaneously but since this is a rectangular piece I can't do that.
Now I will start decreasing on one side.
Start decreasing

If you are joining a new colour, do so. I usually make a knot so that they are more strong, but you can follow any method of joining a new colour.
A. Make 3 chains (for increasing a row you make 6 chains)

B. Turn and make a slip stitch into the 3-ch space.

C. Make 3 ch.

D. Make 3 dc into the same space.

E. Continue until the end of the row as usual.

F. If you are making a rectangular piece then start the next row with 6 ch and continue increasing the length, (you are going to decrease only on one side and increase on the other side for a rectangular piece), but if you are making a square piece then make 3 ch and follow the steps from A because you have to decrease on both side simultaneously.
You can see in the below photo that I have increased this side of the row and continued to work until teh end of the row.

G. When you have reached the end of the row you would have made 3 dc into the last box of the previous row. Now make a slip stitch to the 3-ch space as shown below.

H. Make 3 ch.

I. Slip stitch into the next 3-ch space.

J. Make 3 chains and 3 dc into the same space.
Continue working in this manner. In the below picture you can see the side where I have stopped increasing has started to level off.

Since I have reached the required length on the other side of the stool too I have to now stop increasing and start decreasing on both the sides.

So for decreasing on the other side also follow the steps from A and continue until the end.
Oh phew! I am exhausted.
I hope my tutorial is clear enough. Go ahead, take the plunge and do a blanket, a pillow cover, shawl, whatever... or even a dishcloth might be an excellent idea to test this new stitch.

Have a nice weekend.

Excelente tutorial!!
ReplyDeleteTu header blog está hermoso!!!
Yo espero tu visita
cariños
Even though that looks simple and I am an avid crocheter would u have an easier pattern your new friend. Linda Kelley
Deletelovely!!!! shall def try this out soon!
ReplyDeleteYour stool cover looks great. Thanks for sharing your tutorial. :)
ReplyDeleteWow you´re really an crochet-artist;)and very generous, thanks for this tutorial, it looks like you had a lot of work!..just beautiful!
ReplyDeleteJenMuna
Hola. Te ha quedado precioso y gracias por el tutorial. Ya conocía este punto y la verdad que es un poco lioso al principio, pero luego es rápido de hacer.
ReplyDeleteQue tengas un buen fin de semana.
Susana.
Great job ! It's really nice and thank you for sharing the way to do crochet diagonally...
ReplyDeleteHave a pleasant weekend.
Anna
Very nice, now I'm looking for a table top to decorate, thanks for sharing :)
ReplyDeleteThanks so much for posting this wonderful tutorial. It is such a great pattern.
ReplyDeleteMeredith
This is fantastic! I've always wondered how to do this. Thank you so much!
ReplyDeleteI looked at this back when you posted it...and was fascinated. I happened upon it again this morning via a link page...it's STILL fascinating to me. I'm placing it on my "must try" list...I am envisioning a muffler/scarf. Thanks for sharing what you learned!!!! You did a great job! Hugs, Annette
ReplyDeleteI love your blog! :D
ReplyDeleteLove, from Malaysia.
What a great tutorial, you have a real knack for it!
ReplyDeleteAwesome! I crochet all the time but haven't tried anything diagonal yet... might have to soon!
ReplyDeleteEmily
domesticdeadline.blogspot.com
That is a great cover! I am really new to crocheting so this is definitely out of my league however I have pinned for future reference and cannot wait to try this when I have more confidence in this craft as well as the courage.
ReplyDeleteThanks so much for sharing.
I love the name of your blog. It describes me perfectly. :-) This is so pretty! I love the tutorial. It really makes me feel like I can do it. I am a new follower from Keeping it Simple. Vicky from Mess For Less
ReplyDeleteThank you so much for your great tutorial! Your stool cover looks wonderful, I will make one for me too!
ReplyDeleteHave a beautiful day! Barbina
Came here on recommendation from TheBluntBlogger. Beautiful crochet.... Totally smitten by your work!
ReplyDeleteBeautiful stool cover!! The colors look so great together! Thanks for sharing your cover and tutorial at the Tuesday To Do Party!
ReplyDeleteSmiles!
Jami
www.blackberryvine.blogspot.com
ths s amazing...
ReplyDeletepinned this for later. I think I've wrapped my head around it but I know it'll all go out the window once I pick up a hook! I love the colors you used. What yarn did you use?
ReplyDeletehttp://chickenscratchny.blogspot.com
Thanks for teaching us how to do that, I didn´t know how that is done.
ReplyDeleteKATRIN W.
Hi Pradeepa,
ReplyDeleteFab tutorial.Always wanted to master this stitch...thanks to you, no reason not to now!!!
Thank you so much for this!!
yay..crochet!!
Hugs,
Ramya
Oh so many hours ago - as I was commenting on your other posts - I saw this. I am just making it back...I've been mastering "diagonal" much of the day...in between other things I was doing. Thanks for the great tutorial. I'm working on a scarf...and have run out of the yarn I need. I fear I'm going to have to scrap this one and start over with different colors. That will be tomorrow's endeavor! Thanks again!
ReplyDeleteVery nice!! Thank you for this!
ReplyDeleteI love all your tutorials. Thank you for posting them. Your directions and photographs are
ReplyDeletewonderful. I've been wanting to try diagonal crochet then I saw your basket weave! Wow!
I can't wait to start.
This is wonderful! I was looking for exactly this to help my great aunt replicate a family block she treasures, from her late sister. Thank you!
ReplyDeleteThis is awesome - I am going to try and make this! Thank you so much.
ReplyDeleteThank you - am enjoying making my diagonal square blanket thanks to your instructions. A nice pattern.
ReplyDeleteThis is def the most detailed and best ever tutorial ever. So glad I found your site/blogspot page.
ReplyDeleteWonderful toturial. I'm not that experienced in crotching, but this toturial made me try and it's actually pretty simple. Thanks a lot :-)
ReplyDeleteJoan from Denmark
Thank you for the best instructions I have ever seen for this position.
ReplyDeleteBeautiful, thank you!
ReplyDeleteI've been doing this for years.......first time I have seen it in print....my friends will enjoy seeing the step by step pictures as they work on this beautiful pattern
ReplyDeleteThank you for these wonderful incredibly clear instructions! I succeeded the very first time that I tried them!!!
ReplyDeleteCan you post directions on how you did the edging? I have done two blankets this way before but couldn't figure out a decent way I liked to edge it. Thanks!
ReplyDeleteFinally a very good and very clear instruction. Thank you so very much.
ReplyDeleteSo great tutorial, thank you!
ReplyDeleteOne of the easiest tutorials I've seen. Thanks for posting.
ReplyDeleteThank you so much!!!!Amazing tutorial!!
ReplyDeleteTaty
thanks. my cousin sent me the pattern. could not figure it out till I came across this post. Apparently they make afghans this way we will see how it goes
ReplyDeleteI have a question how did you do the edging? I made an afghan and feel like it needs an edging.
ReplyDeleteIt's two rows of [sc in next st, ch 1, skip next st] repeat. Next row will be [dc in next st, ch 3, skip two ch-1 spaces] repeat. New 3 rows will be 3 dc worked into each ch-3 space followed by 3 chains.
Deletethank you
Delete