Sunday, February 27, 2011

Painting on a leaf and a WIP

Pin It
Have a look inside my diary and see what I found. It is a painting which I had done on a piece of plantain (banana) leaf many many years ago when I was in school. I had put it inside my diary and almost forgotten about it. Suddenly remembered it only a few days back when I saw somewhere a painting done on a leaf. Luckily I still have this diary with me (I don't throw away my old stuff very easily). And surprisingly it is still intact.


After photographing it is back to the place where it had been lying all these years and I don't know for how many more years it is going to be there.

Here is my current WIP. This is my own pattern. I don't know whether it will turn out into the tablecloth I am planning to make to fit the coffeetable or just a doiley. Let's wait and watch. Of course, I am writing down the pattern to share it with you all.


Have a nice day.

Sunday, February 20, 2011

Swirl Patterned Tablecloth

Pin It

This is also one of my oldest projects, done during my college days. It still adorns my coffee table though it has a few stains that won't go away. I had to be very careful while photographing to avoid making those stains very obvious.


The pattern is from the book "Stitch by Stitch." The original pattern was for a shawl with a floral border. I felt that the floral border was a bit too complicated for me. So I skipped it.

Here is the instruction for you.

Ch 4 and sl st into first ch to form a ring.

1st Rnd:  (5ch, 1 sc into circle) 8 times, sl st into center of first loop. You have 8 loops.

2nd Rnd:  1 sc into first loop, (4 ch, 1 sc into next loop) 7 times, 4 ch, 1 dc into first sc.

3rd Rnd:  2 dc into first loop, (3ch, 1 dc into next sc, 2 dc into next loop) 7 times.

4th Rnd:  (3ch, skip next dc, 1 dc into each of next 2 st, 2 dc into next loop) 8 times.

5th Rnd:  (3 ch, skip next dc, 1 dc into each of next 3 st, 2 dc into next loop) 8 times.

6th Rnd:  (3ch, skip next dc, 1 dc into each of next 4 st, 2 dc into next loop) 8 times.

7th Rnd to 11th Rnd:  Cont. working in this manner by increasing a dc between the 2 dc worked into each loop.  Finally there should be 11 dc in each panel.

12th Rnd: (3ch, skip next dc, 1 dc into each of next 5 st, 3 ch, skip next 2 st, 1 dc into each of next 3 st, 2 dc into next loop) 8 times.

13th Rnd:  (3 ch, skip next dc, 1 dc into each of next 4 st, 2 dc into next loop) 16 times.

14th Rnd:  (3 ch, skip next dc, 1 dc into each of next 5 st, 2 dc into next loop) 16 times.

15th Rnd: (3 ch, skip next dc, 1 dc into each of next 5 st, 2 dc into next loop) 16 times.

16th Rnd to 20th Rnd:  Cont. working in this manner. You will have 13 dc in each panel.

21st Rnd:  (3 ch, skip next dc, leaving last loop of each on hook work 1 dc into each of next 2 dc, -year-old and draw a loop through all 3 loops on hook – 1 dc decreased, 1 dc into each of next 10 dc, 2 dc into next loop) 16 times.

22nd Rnd:  (3 ch, 1 dc into each of next 12 dc, 2 dc into next loop) 16 times.

23rd Rnd:  (3ch, 1 dc into each of next 13 dc, 2 dc into next loop) 16 times.

24th Rnd:  (3 ch, 1 dc into each of next 14 dc, 2 dc into next loop) 16 times.

Decrease in this way on the next and following 4th round and then work 3 rounds without shaping.  32 rounds worked, 22 dc in each panel.

Continue the pattern, decreasing 1 dc at beginning of every panel on next and every 3rd round until 55 round from beginning have been worked, ending with 3 ch, sl st into first st of next panel.  37 dc in each panel.

You can increase or decrease the number or rounds according to the size you desire. You can add your own edging to it.


Sunday, February 13, 2011

Fabric Flower

Pin It


This simple fabric flower I had sewn in the denim organizer is pretty easy to make. Here is how I made it.


That's it.

Denim Pocket Organizer

Pin It
Here is a Martha Stewart inspired denim pocket organizer. There is also one in Molly's blog.

I used my son's old jeans, cut out the pockets and made this.


I appliqued the heart, painted the words using fabric paint (actually I wanted to embroider them but didn't turn out well), embroidered the chillies, and sewed on the fabric flowers.


Friday, February 4, 2011

My sweet heart bag

Pin It

All these days I had been crocheting only tablecloths and doileys. Only recently I started experimenting with toys and bags. I had never imagined making these would be so easy. Now I have become addicted to it. I have so many in my "to do" list. This bag in one of them. I got the inspiration for this bag from attic24. That bag was a multicolored one but I chose to make it using one color. Actually I started off with her instructions but midway through I got bored of doing the same stitch again and again. So I thought I would tweak it a bit here and there. When going through my crochet books I came across this basket weave pattern. Initially I thought it was a difficult one but since I did not find any other pattern as interesting as this one I decided to give it a try. Believe me, it is not at all difficult and I never got bored doing this.


Here is the instruction for the bag

Ch 4.  Join with sl st to form ring.

1st Row:  C 3 to count as 1st dc.  Make 10 dc into ring.  Join to the top of 3rd chain.  (11 dc). 

2nd Row:  Ch 3 to count as 1st dc.  1 dc in the same stitch.  Make 2 dc in each stitch till end of row.  Repeat.  Join. (22 dc).

3rd Row:  3 ch.  1 dc in same st.  *1 dc in next stitch, 2 dc in next stitch.  Repeat * till end of row.  Join.  (33 dc).

4th Row:  3 ch.  1 dc in same st.  *1 dc in next 2 st, 2 dc in next st.  Repeat.  Join.

5th Row:  3 ch.  1 dc in same st.  *1 dc in next 3 st, 2 dc in next st.  Repeat.  Join.

6th Row:  3 ch.  1 dc in same st.  *1 dc in next 4 st, 2 dc in next st.  Repeat.  Join.

7th Row:  3 ch.  1 dc in same st.  *1 dc in next 5 st, 2 dc in next st. Repeat. Join.

Continue this way till the 14th row.

14th Row:  3 ch. 1 dc in same st. *1 dc in next 12 st, 2 dc in next st. Repeat till end of row.  Join.  You will have 154 st in total.

15th Row:  3 ch.  1 dc in each dc till end of row.  Join.

Repeat the 15th row for 10 more rows before starting the basket weave pattern.

25th  Row:  Start the basket weave pattern.

25th to 44th Row:  Basket weave pattern.  This pattern has vertical and horizontal blocks. Each block I have made is 4 stitches across and 3 rows deep.

45th to 48th Row: 3 ch. 1 dc in each dc till end of row.  Join.

To make the shell edging

Make 1 ch. 1 sc into next st. *Skip 2 st and make 7 dc into the next st, skip 2 st, 1 sc into next st. Repeat * till end of row. Join.

Straps (make 2)

I got the pattern for the straps from here. But the pattern is not so distinct in my bag because of the single color I used.
 
You can attach the straps to the bag and your bag is ready. 
 

Now to the final part. Initially I planned to make a flower and stitch to the bag, but I felt it was so common and I wanted something different. Then I found the pattern for the heart from here

So I made two hearts and a small strip and sewed the two ends of the strip to the hearts and tied to the strap. 

I hope you enjoy making this bag.

Crochet: Basket weave pattern

Pin It


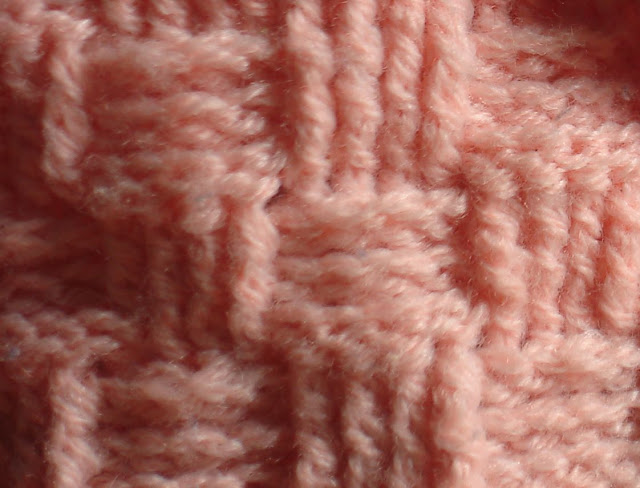
The basket weave pattern consists of horizontal and vertical blocks.  You can vary the number of stitches in each block. I have made each block 4 stitches across and 3 rows deep (it appears to have 4 vertical lines and 3 horizontal lines).  Like me I know many of you might be quite apprehensive to try this pattern initially.  But it is not at all as complicated as it appears to be.  Normally we work on the top of a stitch but in this pattern we are going to work around the stitch. We call each stitch a post.


We work around the post by inserting the hook from back to front and front to back to produce the horizontal and vertical patterns. I have tried to explain it as best as I could through these pictures.

First to make the vertical blocks.


1. Wind the yarn around the hook.


2. Insert the hook between the first and second posts from front to back.


3. Wind yarn around the hook and draw the yarn through.


4. Now you have three loops on the hook.


5. Wind yarn around hook and draw through the first two loops and you have two loops on the hook now.


6. Draw the yarn through the remaining two loops and you have made one stitch.


7. Make three more stitches and you have the first row of a vertical block.

Now for the horizontal block


1. Wind yarn around the hook.


2. Take the hook behind the fabric.


3. Insert hook from back to front between the posts.


4. Take the hook around the post to the back of the fabric.


5. Wind yarn around the hook and draw it through the posts.


6. Now you have three loops on the hook. Yarn around hook and draw through two loops.


7. Again draw through the remaining two loops.


8. Now you have made one horizontal stitch.


9. Make three more stitches and you have the first row of the horizontal block.


While doing the bag, continue working in the above-mentioned manner till the end of the row. Make two more rows to form alternating vertical and horizontal blocks. For the fourth row you have to reverse the sequence, i.e., form vertical blocks at the top of the horizontal blocks and horizontal blocks at the top of the vertical blocks. This way you form a basket weave pattern.

I hope the instructions were clear enough.
Related Posts Plugin for WordPress, Blogger...